Posts

Showing posts with the label project

LET'S PLAY HOUSE

Image
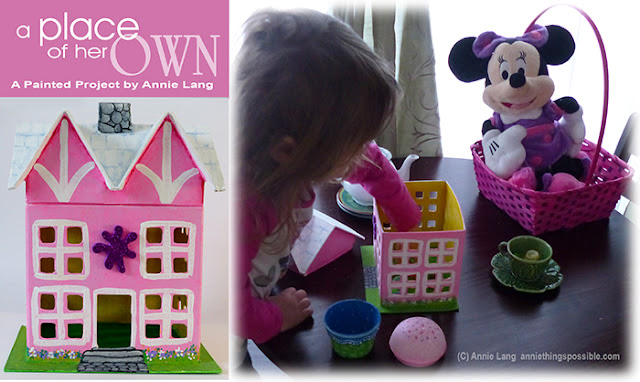
Every little girl needs a place of her own in the world of make believe.  I had originally purchased 6 paper mache house shaped boxes to create a Christmas village for the holidays.   However, once the houses arrived I decided that a happy neighborhood of houses for my granddaughters would be a more practical use as they would actually be put to use all year around.  I will add houses one by one until their collection is complete.  Toy figurines easily store inside these boxes and each house can serve as a delightful accent item on the guest room shelves.  This is the first painted house I completed and it was overwhelming received by a very happy girl! Here's how I painted the girls very first house and hopefully will inspire you to make your own happy neighborhood! SUPPLIES Darice DIY Crafts Paper Mache House Box Medium 8-1/2 .   I bought a package of 6 so the cost was only $5 each.   These houses are also available as sets with a large, medium and small sized box in each s

HATCH SOME EGGS

Image
Here's 3 fun little Springtime egg characters guaranteed to make you smile! They also make great basket stuffers,  Baby Shower decorations and Mother's Day gifts. Feel free to share this page link with your friends and family so they can get creatively inspired, too.  To download the patterns at the bottom of this page, right click and save image to your computer. Supplies: 4 1/2" paper mache egg for each featured character sponge brush for basecoating assorted brushes and liner brush 3"x3" scrap of white watercolor paper for bunny ears adhesive to attach bunny ears to the egg transfer paper Assorted Acrylic Craft Paints   as follows... Funny Bunny Hatchling:  white, black, baby blue, true blue, pink, burgundy, spring green, true green Happy Chick Hatchling:  bright yellow, light yellow, orange, burgundy, white, lavender, dark purple, pink, spring green, true green, black Peeper Hatchling:  bright yellow, light yellow, orange, pink, burgundy, white,

LET'S HEAR IT!

Image
Whether you're reading with a youngster one on one or reading to an entire group, bring the story to life and make it a memorable experience by adding a few story activities to enhance the experience!  Here are a few basic ideas you may want to try... Make up 8-10 questions about the story and write each one on a piece of paper. Draw a question and then discuss!  Enhance the story environment!  Relate a scene from the story you are reading by creating a "real life" experience.  For example, if the story is about cookies, you could share a "cookie snack".  If the story is about camping, maybe you could read the story together in a makeshift "tent". How about sharing some "Green Eggs and Ham"? If you're reading one of my Elf books, maybe you'd like to try sharing a cup of cocoa after the story.  I'm sure you can easily imagine all the endless possibilities.   Make a set of "Listening Ears" that you can wear

MAKE SUMMER MORE FUN!

Image
Beverage Wraps are fun to make and the Kids just absolutely LOVE them! Here's 2 FREE wrappers for you to enjoy...featuring fun "Monster" character art from my Out of This World Linework Pattern Workbook .  Simply PRINT the page on white paper or cardstock, cut out the wrappers and fasten them to soda cans or water bottles.  Make as many as you want and you can personalize them, too! Here's a tip ...before cutting out the wrappers,  add personalization and then cover the page with clear Contact (R) paper or laminate sheet to keep printer ink from bleeding should the wrapper happen to get wet.  Enjoy and have a "monsterously FUN SUMMER!   CLICK to ENLARGE and SAVE full size pattern project to your computer! 

It's a TEA PARTY!

Image
Anytime is Time for Tea! But now that the patio furniture is out and the flowers are blooming, it's even better if you serve it in the garden! You can make fun greeting cards, invitations, painted napkins, tea serving novelties and more using patterns from Let's Have Garden Tea .  For the sample picture, I made a quick 5"x7" greeting card using the pattern below with cardstock, colored pencils and a black ink pen. I cut the frame from pink background paper and then embellished it with a bit of glitter.  To use this free pattern design for your own creative adventures, simply right click the image and then save it to your computer.   CLICK to ENLARGE and SAVE full size pattern project to your computer!  

GOT A BEAR IN YOUR HAIR?

Image
You can Download this Adorable Hair Bear Printable Project for FREE!   Little Jackson sat still just long enough for me to take this shot of him with a bear in his hair...and believe me...it wasn't easy chasing an excited toddler around the room with a camera!  This project features character art from my newest Children's Book, " Now That's Just SILLY !" and is perfect for wearing during a storytelling session. If you're not familiar with the  newest "Annie Lang" book release...just watch this quick trailer to get a glimpse of what it's all about.  Right Click on the "Annie Lang" project page image and then "SAVE" to your computer!     

Love Hugs? They're FREE!

Image
If you love Bear Hugs as much as I do...you'll LOVE making this fun project! To make this card... 1. Save the image to your computer. 2. Print on heavy white paper or cardstock. 3. Cut out the card along outside edges. 4. Fold along center line. 5. Personalize any way you please. 6. Embellish with g I litter, embossing & more! 7. Give the card to someone special... and don't forget to give them a hug!!! Click the Design for Full Page Image

FREE Snow Lover's Project!

Image
If you love the snow...you'll absolutely love making this t-shirt project! The snow may be blowing outdoors but you can make this adorable Snow Lover's T-shirt any time of year!  The pattern was created using patterns found in " It's Snow Time " Linework Pattern Workbook.  I've reversed the linework for you so it's ready to be transferred onto the center of the t-shirt you'd like to color. Here's how I made this adorable little tee for my Granddaughter... SUPPLIES:  White t-shirt Printout of the pattern page shown below Black fabric transfer pen Household iron Cardboard to insert into the t-shirt before painting Fabric paint and brushes or fabric markers Left click the image and SAVE  full  size  page  to your  computer.  Print  image as  full size 8.5"x11" paper . F ollow the project instructions!  PROCEDURE: 1.  Launder a white t-shirt before you begin 2.  Use the black transfer pen and outline the pattern desig

Got Listening Ears?

Image
Make these fun "Listening Ears for Little Elves" and your holiday storybook reading will be an instant hit with the younger crowd!  To make listening ears like mine, just download the printable project and follow the directions.  I put double sided sticky tape along the top of the plastic headband and then attached a length of tinsel garland.  I wear my listening elf ears while reading my " A Little Elf Upon a Shelf " to the kids and every time I do...it fills the room with giggles! Enjoy the project and feel free to share this link (but please do not post the (C) project data file) so your friends and family can download their own set of ears!

There's Magic in the Air!

Image
Make some Holiday Magic This Year! My Holiday decorating is done for the year and because my new little granddaughter is now toddling about, I kept everything to a festive minimum this year.  Silver tinsel garland, evergreens, bright white mini trees, battery lit candles, big red bows and a beautiful angel wreath above the mantel are my decorative choices to create the Christmas Magic in our home this season! However, the real Holiday Magic will happen when the kids and grandkids drop by on Christmas Day and the house will be filled with the spirit of the season. This week, I've completed "Our Year 2014" home video that we'll all watch together, dinner planning is in the works and all the gifts have been wrapped and will be placed under the tree on Christmas Eve. If you're in need of inspiration and patterns, you'll find my " Christmas Wishes " Linework Pattern book has just what you need!  

Shuttered Again!

Image
I purchased this pair of old shutters and with a few on hand supplies, turned them into a unique wall décor item.  The original shutters had a distressed look that didn't suit my home décor so I lightly sanded and then painted over the finish. I could have put a mirror, glass or textured fabric behind the scrolled opening to add more interest, but chose instead to leave it as is.  A pair of hinges holds the two shutter panels together to create a single item.  Hangers were placed on the back and it's now on display over my buffet server.  Hanging It Up I've always had a little trouble when it comes to hanging home dec items evenly on the wall but here's a tip you might find helpful when it comes to spacing the wall hooks so they match the hangers.  Once you've placed the painter's tape as desired, use a level to make sure it's even before you start poking holes in the wall! 

Don't Trash the Cabana Free Project!

Image
Here's a FREE Project I think you'll enjoy...Includes patterns and instructions by Annie Lang Just Click the Images, "Save" to your computer and SMILE! (C) Annie Lang  anniethingspossible.com NOTE: HELP KEEP THE FREE DESIGNS COMING!   IF YOU'D LIKE TO SHARE THIS PROJECT...Please share the page link and not the pattern designs so your friends and family can download copies directly to their own computers...Many Thanks!   To learn how to trace and transfer linework pattern designs... you can watch this quick VIDEO! CLICK THE IMAGES FOR FULL SIZE PATTERN CLICK HERE to find DecoArt Americana Multi-Surface Satin paints and info!  

Make a Gilded Aged Pumpkin!

Image
Paper mache pumpkins with a "gilded" makeover It's a lazy Autumn afternoon and it's the perfect time to create a batch of "gilded aged" pumpkins to decorate my front porch. I happened upon some paper mache pumpkins on sale after Halloween (marked down 90%!) and unable to resist the bargain, took them home  to use for Autumn accents. It took me about an hour to complete all 3 pumpkins using  DecoArt paints shown below.