CRAFTING OUT SPACE
It doesn't matter how old you are because everyone needs some creative space!
For the past year or so, I've slowly but surely been introducing my young granddaughter to the world of imaginative arts and crafts. Since most toddlers are easily frustrated, have short attention spans and a natural desire to "do it themselves", I only introduce one activity concept at a time. This allows me to see whether or not she can handle the project or if it is an activity she enjoys.
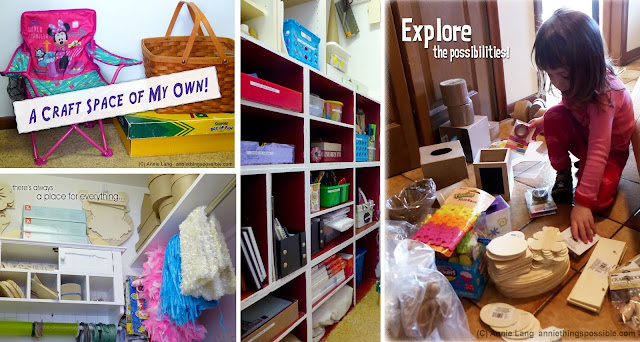
I discovered that threading noodles onto a string is not her cup of tea and that leaving her to paint "freestyle" onto surfaces of her choice comes naturally at her age. So now that we've explored the many creative possibilities, I decided it was time to set up a crafting storage space in the guest room closet so she can choose her own supplies and projects to work on when she comes to visit.
So whether you're a grandma, mom or day care provider who works with kids, I hope you'll find some of these ideas useful as you craft out a space of your own!
1. LET THEM HELP
When boxes of craft supplies arrive on the doorstep, unpack everything
together. Kids are natural helpers and with each item you open, let them help you sort things into piles. It's also a great time to talk about what
they are, what they are made out of and ideas as to how the items can be used for future projects.
2. CUBBYHOLES, BASKETS, BOXES AND BINS
Make necessary supplies reachable! Clear containers, mini crate bins, open boxes and small baskets are ideal for storing all those creative supplies. In
my experience, if you can't see it...it won't get used. I keep a large craft
project basket handy so we can choose our project items and easily carry
everything downstairs to the kitchen table. It's also handy when the project
is over and you need to return items to the shelves. Most of the clear boxes, bins and mini crates were purchased at the dollar store. Repurposed banker box lids are ideal for storing papers, foam or felt sheets and glue gun
supplies. Mugs are great for pencil and brush storage.
3. WHAT ABOUT THE LITTLE STUFF?
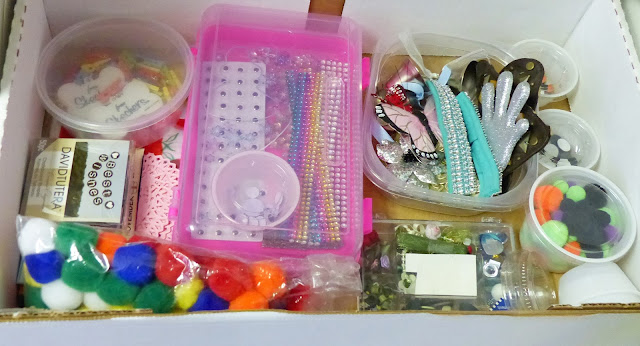
I once used a tackle box to store mini embellishments necessities like
jewels, gems, magnets, minis, wiggle eyes, etc. but I only needed to drop it
once to discover just how impractical it was! I now store these items in
individual mini deli and condiment containers with clear lids along with clear
pencil boxes for larger items and hinged button boxes for odds and ends.
All the items are stored together in a sturdy cardboard box that fits neatly on the shelf for easy access to all our embellishments.
4. DESIGNATE A LOCATION
Even though my current supplies will constantly be changing, designating a
specific cubbyhole or shelf will insure everything will be easily located time
and time again. If you've ever changed your kitchen cabinets around, you'll know what I mean!
5. LABEL EVERYTHING!
I know it's a pain, but labels really do work. I used my label maker, but
blank self adhesive address label sheets work too. My granddaughter
helped me by typing out the letters for each label (we practiced our ABC's while we are at it) and she got a kick out of watching each label emerge
from the machine. I left the "Oodsies" label as she printed it just so I could giggle every time I open the craft supply closet!
6. DOUBLE THE SPACE
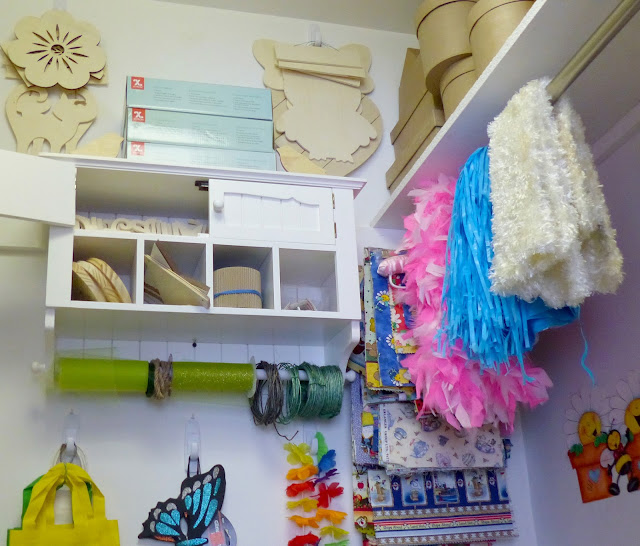
I was finally able to put an inexpensive bathroom storage cabinet I
purchased years ago (it didn't fit the space I intended it for!) to good use
in the craft supply closet. By removing the drawers, I doubled the space
because I can now use the empty cubbyholes for odds and ends storage. Each of the removed drawers contain even more items. The towel bar is ideal for holding spools of ribbon, twine and crafting wire so it's a
practical "win-win" storage solution.
7. STACK IT TO THE CEILING
For storing a variety of large paintable crafting surfaces, don't be afraid to
stack them on a shelf to the ceiling. The shelf was previously stacked high with pillows, sheets and boxes and it IS a closet, after all! I also use large
plastic "damage free" hooks that I buy in bulk at Sam's Club to hang large
items and decorative accessories on the wall in plain sight. If they are
buried in a box, they'll never get used!
8. HANGING AROUND
Swatches of craft fabric can be placed on pant hangers with clips and then
hung onto the closet bar. This makes it easy to flip through each fabric
panel in lieu of digging through a box. The closet bar is also ideal for
hanging costume items like fur strips, feather boas, luau skirts and more.
Hat hooks will eventually be added to the wall beneath the closet bar as our costume collection grows.
Feel free to share your own pictures and ideas with me
on my Annie Things Possible Facebook Page!


